Kontakt - Basic User Interface Creation
Kontakt - Basic User Interface Creation
- View
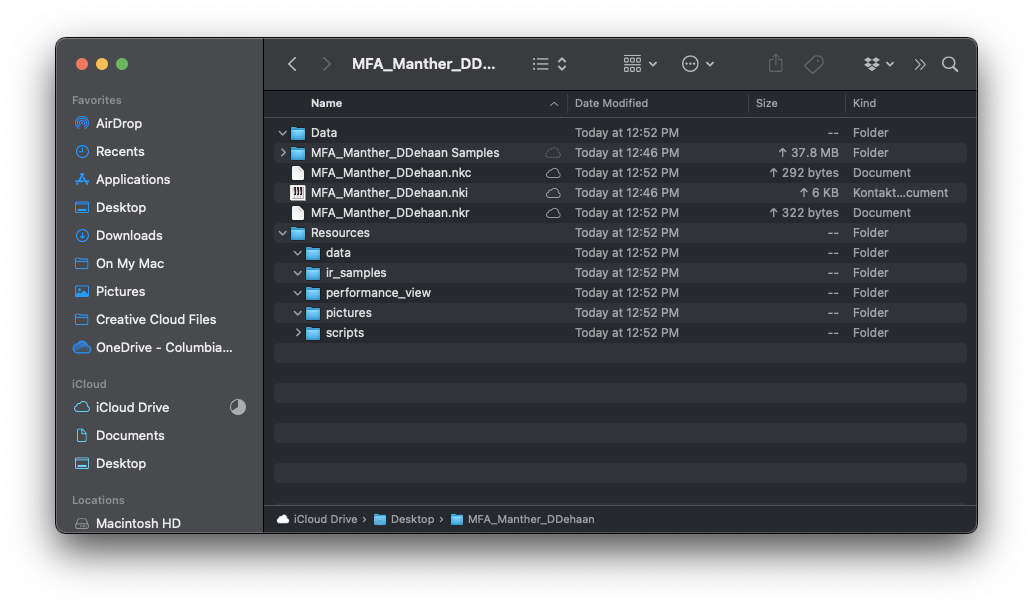
Instrument Resource Folder
If you plan on using custom images for the background, instrument icon, or controls, your Kontakt instrument will need to have a “Resource Folder” that contains all the images you plan on using.
Creating a Instrument Resource Folder
- First, Save your instrument within a folder that will contain everything your instruments needs (the instrument “.nki” file, the samples, and, soon, all the additional Kontakt resource files and folders).
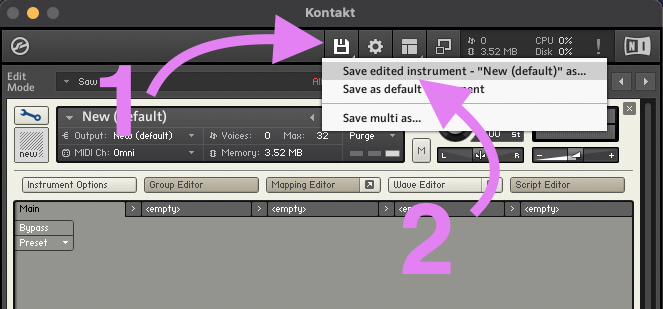
- Next, then open the Instrument Options window.
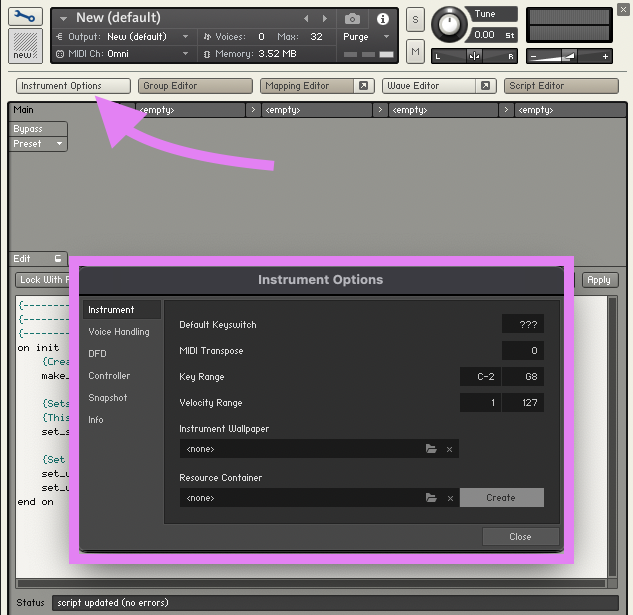
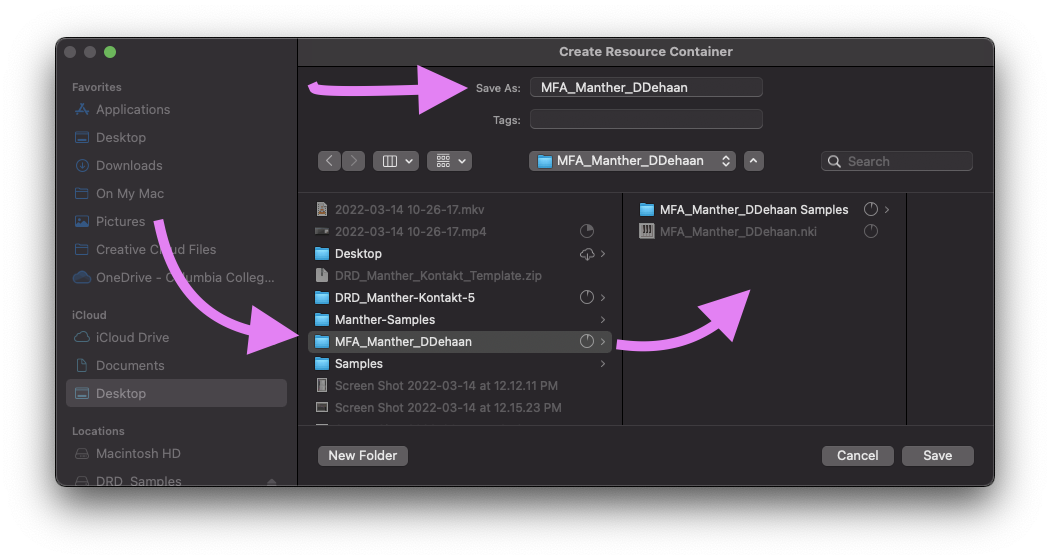
- Near the lower right corner of the “Instrument” tab, click the “Create” button to create a Resource Container folder for your instrument. Save the Resource Container with the same name you saved your instrument, or if this is for a library of instruments, the name of your library.
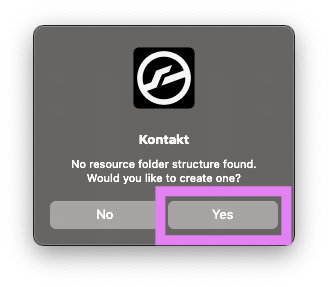
- Click “Yes”, when Kontakt says, “No resource folder structure found. Would you like to create one?”
- Kontakt will then give you a report, showing everything that is currently contained inside the new resource folder (which is nothing). We’ll add a few things in a moment. So you can just click “OK” for now.
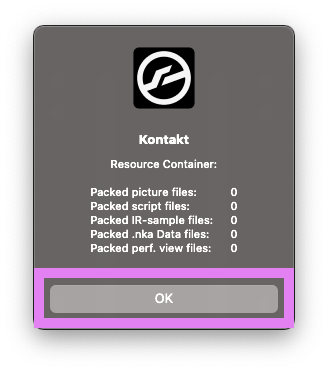
- Take a moment to review the contents of your instruments folder. It should look similar to the image below.
Performance View
Creating a Performance View
Each custom GUI starts by creating a what Kontakt calls a “Performance View” within the on init callback with the line make_perfview.
on init
	{Create a Performance View for this Script}
	make_perfview
end on
Setting the Size of the Performance View
The size of the performance view can be set within the on init callback using the following two lines.
-
Height in pixels:
set_ui_height_px(pixel height) -
Width in pixels:
set_ui_width_px(pixel width)on init {Create a Performance View for this Script} make_perfview {Set the height and width of the performance view in pixels} set_ui_height_px(205) set_ui_width_px(633) end on
Kontakt’s Units of Measurement
Kontakt can use two different units to set the size and placement of GUI objects or parameters: pixels or grid units.
For example, the height of the performance view can either be set to a specific number of pixels using the set_ui_height_px or it can be set to a specific amount of grid units using set_ui_height.
If a command ends in px it is using pixels. If it does not end in px it is using grid units.
A Kontakt performance view can be a maximum of 6 grid units wide and 16 grid units tall.
Adding a Custom Background
You can set the background image of a performance view by…
-
First creating and adding a custom PNG file to the
/Resources/Pictures/folder. The PNG file should be the same width as the instrument’s performance view and the same height plus 70 pixels (to fill the area behind the instrument header). -
Use the following line of code within the script’s
on initcallback to assign a custom PNG as the wallpaper image.set_control_par_str($INST_WALLPAPER_ID,$CONTROL_PAR_PICTURE,"DRD_Manther_Main_Background")
⚠️ Unlike GUI controls, which can be dynamically assigned to custom images, each script’s performance view can only use one image file as its background and it can only be set within the on init callback. However, you can use an image that is taller than the performance view’s height and adjust its vertical offset using set_skin_offset(<offset-in-px>)
Here is a simple example:
Adding a Custom Instrument Icon
To give your instrument a custom icon…

-
Create a custom PNG file that is 72 pixel tall by 72 pixels wide.
-
Add the custom PNG to the
/Resources/Pictures/folder along with a plain.txtfile with the exact same name as the custom PNG file. The.txtfile should contain the following information including an empty line at the bottom.Has Alpha Channel: yes Number of Animations: 0 Horizontal Animation: no Vertical Resizable: no Horizontal Resizable: no Fixed Top: 0 Fixed Bottom: 0 Fixed Left: 0 Fixed Right: 0 -
Within your instrument’s script add the following line of code to the
on initcallback.set_control_par_str($INST_ICON_ID,$CONTROL_PAR_PICTURE,"Name of PNG")
UI Button
ui_button KSP Reference Manual Link
Creating a Button
declare ui_button $buttonSetting the Display Text
Only used if you are not assigned the button to a custom PNG
set_text($button, "I am a button!")Text Alignment
The text of displayed on a default button can be aligned left 0 , centered 1 , or right 2 using the following line of code.
set_control_par($button_id, $CONTROL_PAR_TEXT_ALIGNMENT, 1)Font Type
The font type can be set to any of the 25 fonts included in Kontakt.
set_control_par($button_id, $CONTROL_PAR_FONT_TYPE, 0)Additionally the specific font used for each of the responsive states of the button can be set using the following:
- On:
$CONTROL_PAR_FONT_TYPE_ON - Off pressed:
$CONTROL_PAR_FONT_TYPE_OFF_PRESSED - On pressed:
$CONTROL_PAR_FONT_TYPE_ON_PRESSED - Off hover:
$CONTROL_PAR_FONT_TYPE_OFF_HOVER - On hover:
$CONTROL_PAR_FONT_TYPE_ON_HOVER
Setting the Width
Only used if you are not assigning the button to a custom PNG. If you assign a button to a custom PNG it will automatically adjust to fit.
set_control_par($button_id, $CONTROL_PAR_WIDTH, 120)Setting the Height
Only used if you are not assigning the button to a custom PNG. If you assign a button to a custom PNG it will automatically adjust to fit.
set_control_par($button_id, $CONTROL_PAR_WIDTH, 120)Custom PNG
Button’s can be assigned to a custom PNG image that contains six vertically aligned animation states.

The plain .txt files that accompanies the custom PNG files in the /Resources/Pictures/ folder should be named the same as the custom PNG file and have the following information including an empty line at the bottom.
Has Alpha Channel: yes
Number of Animations: 6
Horizontal Animation: no
Vertical Resizable: no
Horizontal Resizable: no
Fixed Top: 0
Fixed Bottom: 0
Fixed Left: 0
Fixed Right: 0
Creating a Custom Slide
ui_slider KSP Reference Manual Link
Creating a Slider
declare ui_slider $<variable-name> (<min>, <max>)Assigning a Custom PNG
set_control_par_str($<slider id number>, $CONTROL_PAR_PICTURE, "<PNG Name>")You can get the id number of a control using the get_ui_id($<control>) . Often times it is more efficient to store the id number in a variable. Then you can just use the variable whenever you need the id of a specific control.
on init
	make_perf_view

	declare ui_slider $my_slider (0, 1000000) {create the slider}
	declare $my_slider_id := get_ui_id($my_slider) {store its id as a named variable}
	set_control_par_str($<slider id number>, $CONTROL_PAR_PICTURE, "White-Knob") {use the named variable to assign the slider to a custom PNG}
end on